5.4. Creating New Notes
Ok, so now you know how to interact with 7 Sticky Notes, and want to follow to the next step, right? Then it is time for you to create a new note. There are 4 ways you can use to create a new note:
- Using a keyboard shortcut;
- Using the program menu
- Using the "new note" button of a note
- Using the Notes Manager
Each one of these methods is going to be described in more details below:
1. Create a new note using
the keyboard shortcut
7 Sticky Notes offers a few customizable keyboard
shortcuts that allows you to easily access commonly used actions. One of these keyboards shortcuts is the "New Note" shortcut. By default, the new note shortcut of 7 Sticky Notes is "WIN + Z", and is also by default enabled after the first installation. If you would like to change the keys of any one of the shortcuts, or even disable them, just go to the 7 Sticky Notes options and change them exactly like you want.- Using a keyboard shortcut;
- Using the program menu
- Using the "new note" button of a note
- Using the Notes Manager
Each one of these methods is going to be described in more details below:
1. Create a new note using
the keyboard shortcut
7 Sticky Notes offers a few customizable keyboard
Additionaly, you can create a new note using the note-specific CTRL + N shortcut key. This is because this shortcut will only work if you have the note focused, by clicking on it with the mouse, or pressing a key on it. So, once you have the note focused, just press CTRL + N to create a new note!
2. Create a new note using the program menu
As explained previously on topic 5.1., 7 Sticky Notes offers a program menu from where you can access all its functions. If you would like to create a note using the program menu, then just find the "New Note" item and click on it, simple as that!
3. Create a new note using the "new note" button of a note
| You will notice that all notes with a title shows two small buttons on the sides of the title text once you pass your mouse over it (see the screenshot of them at the Sticky Note Layout page). The one on the left is called the "new note" button, and, if you would like to create a new note, all you have to do is click on it! 4. Create a new note using the Notes Manager The notes manager is an advanced tool that lets you completely manage all your notes and Desktops from a single place, and this includes creating a new note. To know how you can create a new note using the Notes Manager, please check the Notes Manager topic. |
|
So, after you chose to create a new note using any of the methods above, the new note is created at the current visible desktop. If "All Desktops" is showed, the note is created at the default desktop. The new note will look something like this:
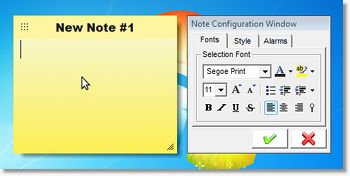
| Important: Until the note is saved, it is like a new document on your computer, for example, a new Word document, which means that if you cancel it, it will disappear and all what is inside won't be saved. Besides that, for now you can only create 1 new note at a time. If you try to create a second note while there is still a new unsaved note present, 7 Sticky Notes won't allow you to create a new note, even if you are viewing another desktop. In this case, all you have to do is click the "Ok-tick" button at the configuration window of the new note to save it, and then go ahead and create a new note! |
|
Copyright© 2013 Fabio Martin | Privacy Policy |
Contact Me

This work by 7 Sticky Notes is licensed under a Creative Commons Attribution-NonCommercial-NoDerivs 3.0 Unported License
Permissions beyond the scope of this license may be available at www.7stickynotes.com.
This work by 7 Sticky Notes is licensed under a Creative Commons Attribution-NonCommercial-NoDerivs 3.0 Unported License
Permissions beyond the scope of this license may be available at www.7stickynotes.com.