3.1. Normal Version Install
The Normal Install of 7 Sticky Notes is the default installation for most users. In this version, 7 Sticky Notes is installed like a normal program, and run from your computer's hard drive.
Installing under non-administrative accounts note: By default all non-administrator accounts under Windows do not have rights to install any programs, thus the normal version installation requires Administrator Rights in order to work correctly. This includes cases where the setup is run from Window 7's Standard User account, and from similar non-administrator accounts. The setup will open in these cases, but will not proceed if you choose "Normal Version". If this applies to you, use Windows' right click menu item "Run As Administrator" over the setup package in order to
proceed with the "Normal Version" install. If this is not possible in your case, then install the 7 Sticky Notes "Portable Version" instead, as it can run under non-administrative environments.Installing under non-administrative accounts note: By default all non-administrator accounts under Windows do not have rights to install any programs, thus the normal version installation requires Administrator Rights in order to work correctly. This includes cases where the setup is run from Window 7's Standard User account, and from similar non-administrator accounts. The setup will open in these cases, but will not proceed if you choose "Normal Version". If this applies to you, use Windows' right click menu item "Run As Administrator" over the setup package in order to
All steps for you to install the Normal Version of 7 Sticky Notes are described below:
1. Download the setup package for 7 Sticky Notes' most current version from the Download page.
2. Locate the setup package file and double click it to open it. (Note: if you are not the computer administrator, run it using the right click menu item "Run As Administrator")
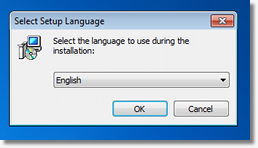
3. Starting from v1.5, 7 Sticky Notes supports multi-language translations. The first window you will see it's the "Select Setup Language" box. At this window, select your preferred 7 Sticky Notes install language from the drop down list and then click the "Ok" button (you will be able to change the language later within the program if you need, as you can see at the Languages section.
| Would like to help? | If you cannot find your language at 7 Sticky Notes, then you can help by translating the program to your language. 7 Sticky Notes is a free program built to help everyone, and by translating it you will help many users that will be able to use the program in their native languages! All translation scripts are available at the Languages Page, and are free and available for anyone to translate them! The help is much appreciated, and if you want to contribute and have any questions, feel free to contact me and I'll explain how to get the translation ready! |
 4. The next screen will show a Welcome message, and will inform the version of 7 Sticky Notes to be installed. Click Next on this screen. 5. On the next screen, select "I Agree" for the License Agreement and then click next. 6. Now you will choose which 7 Sticky Notes version you will install. In this example, select "Normal" to install the normal version and click next.  |
|
   |
|
Copyright© 2013 Fabio Martin | Privacy Policy |
Contact Me

This work by 7 Sticky Notes is licensed under a Creative Commons Attribution-NonCommercial-NoDerivs 3.0 Unported License
Permissions beyond the scope of this license may be available at www.7stickynotes.com.
This work by 7 Sticky Notes is licensed under a Creative Commons Attribution-NonCommercial-NoDerivs 3.0 Unported License
Permissions beyond the scope of this license may be available at www.7stickynotes.com.