5.14.4 Notes Manager's List
Now that you are familiar about how the Notes Tree works, let's move on to the Notes List of the Notes Manager. The Notes List is located on the right side of the window and it shows you a list of the existing notes as showed at the image below:
At the image above you can also see the Note Preview Pane of the Notes Manager, that is showed once you click on a note. It is used to show the note in more details and is going to be described in the next item, Preview Pane.
The Notes List is quite simple to use and you should already be familiarized with it from other software like Windows Explorer, but in any way, here goes a description of how the Notes List work and how you can use its features:
Table View: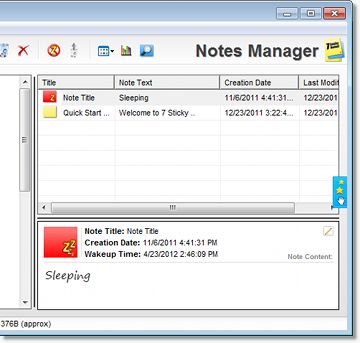 |
At the image above you can also see the Note Preview Pane of the Notes Manager, that is showed once you click on a note. It is used to show the note in more details and is going to be described in the next item, Preview Pane.
The Notes List is quite simple to use and you should already be familiarized with it from other software like Windows Explorer, but in any way, here goes a description of how the Notes List work and how you can use its features:
By default the Notes List will have a "table" view of your notes. This means that it displays by defaults 4x columns with your notes details, which are:
| Title | Shows the title of the note |
| Note Text | Shows a preview of the note text |
| Creation date | Displays the creation date and time of the note |
| Last Modification/ Recycle Date |
If a Desktop is selected, displays the last modification date and time of the note, and if the Recycle Bin is selected, displays the recycle date and time |
| Desktop Name | If the list is showing a search result (see more at the Search topic) or a Sync Area (see more at the Sync File topic), then a last column is added, informing the Desktop name of each Note. |
Notes Icons:
As you might have noticed, the list does not only list the notes, but, it also shows nice preview icons for all the notes, so you can see its themes and quick alarm/sleep configurations! Specifically, the notes' icons will always be showed using its color theme, and, depending on its config/state, with small overlay images one for a clock, showing that the note has an alarm setup, and other for small "zzz", showing that the note is sleeping, as you can see at the images below:
 |
Notes showed with themes icons, plus "alarm" and "sleeping" overlays! |
View Modes:
As showed in previous the Menus and Toolbars topic, you can change the view mode of the Notes List. By default, the List will show the "Details" view mode, that provides 4x detail columns as commented at the item above, but you can change it anytime you want using the upper menus and toolbars buttons, or using its right click menu (which will be showed below). There are 4x view modes available for the Notes List: "Large Icons", "Small Icons", "List", and "Details.
| List Order: The List Pane also offers the ability to show the notes ordered by any of of the columns "Title", "Note Text", "Creation Date", or "Last Modification". This feature works pretty much like in Windows, and all you have to do is click the column you'd like to have used to the sorting. Once you click it a small "  " or " " or " " icon will be showed by the side of the column header to show that the sorting is ascending or descending. Another click on the column switches the sorting between Ascending/Descending. Simple! " icon will be showed by the side of the column header to show that the sorting is ascending or descending. Another click on the column switches the sorting between Ascending/Descending. Simple! |
|
Like the Notes Tree, the Notes List also offers you a right click menu to allow you quick access to all Notes Manager's features. This menu will offer you the same functionality as the upper window menus and toolbar, and some specific items should only be enabled for certain types of notes (for example, the "Wake up" option is only enabled for sleeping notes). To see the descriptions of all available functions, please go to the previous topic of this help Menus & Toolbars.
Multi-select and Keyboard Shortcuts:
The Notes List supports multiple notes select only for the specific operations such as "Recycle", "Remove Permanently", "Center", "Export", "Print", "Restore" (if on the Recycle Bin) and "Move to Desktop", and shows the total selected count at the Notes Manager status bar. The other note functions will be disabled if you select more than one note at the Notes List in order to prevent performance slow-downs or locks, and will be enabled back again once you select a single note.
Additionally, the "Recycle" and "Remove Permanently" can be quickly accessed by your keyboard. To Recycle the selected notes, just press the "Del" keyboard button, and to permanently remove the selected notes, just press the "SHIFT + DEL" keys combined.
Important: If the Notes List is showing your recycle bin notes or any Sync File item, even if you press only the "Del" key once you confirm the removal the selected notes will be permanently deleted! You will not be able to roll back this action, so use it with care.
Drag-and-Drop:
Like the Tree Pane, the Notes List also offers a drag and drop feature. It lets you (1) move the selected notes at the List Pane to any one of the Desktops or Sync Item showed at the Tree Pane, and (2) add specific notes to the Drop Pad so special actions can be performed.
| Simply select all the notes you would like to move to another Desktop or Sync Item, and drag-and-drop them over the destination on the Tree on the left. If you drop the notes on a Desktop, once the notes are moved, 7 Sticky Notes will automatically switch to the destination Desktop to show the just moved notes. Similarly to add the notes to the Drop Pad, just select them, drag, and then drop them over the Drop Pad. If you drop the notes on the Quick Sync or on a Database Image, then 7 Sticky Notes will perform the respective "Sync Up" action. Special Columns: |
|

Horizontal Split Bar:
Finally, you will find right below the Notes List a horizontal black bar, called "Horizontal Split Bar". It allows you to easily change the size of the Notes List and the Preview Pane of the Notes Manager. To use it, just click and grab it it with your mouse.
Copyright© 2013 Fabio Martin | Privacy Policy |
Contact Me

This work by 7 Sticky Notes is licensed under a Creative Commons Attribution-NonCommercial-NoDerivs 3.0 Unported License
Permissions beyond the scope of this license may be available at www.7stickynotes.com.
This work by 7 Sticky Notes is licensed under a Creative Commons Attribution-NonCommercial-NoDerivs 3.0 Unported License
Permissions beyond the scope of this license may be available at www.7stickynotes.com.