5.14.3 Notes Manager's Tree
Once you open the Notes Manager, the first thing you might notice is the Tree View on the left, with Desktops and Notes icons and the Recycle Bin, which is showed at the image below:
The Notes Tree is pretty much straight forward to use and you should already be familiarized with it from other software, but in any way, here goes a description of how the Notes Tree work and how you can use its features:
Basic Structure:
You will always see 2 main nodes at the Notes Tree: (1) "Notes Desktop" item, and (2) the "Recycle Bin" item. If you performed a search at the Search Pane, you'll also see another node, called
"Search Results", with the found notes of the performed search, and if you have the Online Sync feature enabled, you will also have a "Sync File" item, showing all the notes inside the Sync File. Inside the Desktops item you will find all of the Desktops that exist in 7 Sticky Notes, and under each Desktop your notes, with preview theme icons according to their colors. If a note is sleeping, then you will see a small sleeping overlay, with a "Z" letter on the right bottom part of the icon, and if the note have an alarm configured, then you will see a small clock overlay over the note icon. Inside the Recycle Bin you will find all your Recycle Notes, organized by folders of "Day of Removal". To expand/collapse the tree items, just click their "plus"/"minus" signs.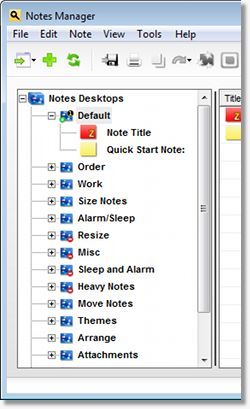 |
The Tree View Pane showed on the left side of the Notes Manager with all Desktops, Notes, and the Recycle Bin. |
The Notes Tree is pretty much straight forward to use and you should already be familiarized with it from other software, but in any way, here goes a description of how the Notes Tree work and how you can use its features:
Basic Structure:
You will always see 2 main nodes at the Notes Tree: (1) "Notes Desktop" item, and (2) the "Recycle Bin" item. If you performed a search at the Search Pane, you'll also see another node, called
Specifically when you click on a Desktop, a Recycle Day Folder, a Database Image inside the Sync File, the Quick Sync, or on a note, all the notes for the group will be filled at the Notes List, and the selected note will be highlighted in blue, and showed at the Preview Pane
Drag And Drop:
The Notes Tree offers you a drag-and-drop function so you can manage the moving of your notes to any other Desktop, the ordering of the Desktops easily and quickly, and restoring Recycled Notes. To use this feature on a note, just click on it either from the Tree itself or from the List Pane and Drag it over the Tree View Desktops, and you will see that they get highlighted showing that the note can be dropped. Drag over the up and down of the Tree and it will automatically scrool for you.
| Additionally, if you are dragging a note from the Sync File (Quick Sync or Database Image), dropping it into any Desktop will move it out of the sync file, and dropping it with CTRL pressed will copy it to the selected Desktop. In the same way, it is possible to send specific or multiple notes to the Quick Sync or existing Database Image by just drag-and-dropping them into these respective items of the Sync File. To know more how the Online Sync of 7 Sticky Notes works, please check the previous Online Synchronization topic, and to know more about using it with Notes Manager, please check the next Sync File topic. |
|
The management of the Desktops using the drag-and-drop functionality of the tree will be explained at the next topic Desktops.
|
Right-click Menus: All elements of the Notes Tree have right-click menus to allow you quick access to all Notes Manager's features. Depending on the item you click (a note, or a Desktop, for example), only the specific menus will be showed (for example, the "Show Note" menu will only be visible if you right click a note), and they will offer you the same functionality as the upper window menus and toolbar, whose descriptions can be found at the previous topic of this help Menus & Toolbars. Additionally, specific if you right click on a Desktop, some extra menus are showed that allow you to manage the Desktops of 7 Sticky Notes. To see how they work, please see the next topic Desktops. |
Desktop right click menu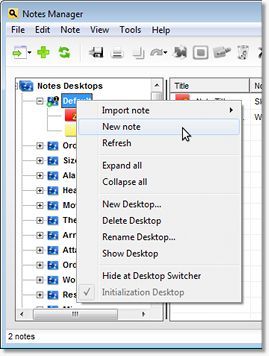 |
If you right-click the "Search Results" node, you will also be able to clear the results, and you will also have Synchronization-specific function menus for the Sync File item. To know more about how to use the Search feature of the Notes Manager, please check the Search topic, and to know how to use the specific Sync File menus, please check the Sync File Management topic.
|
| Status Bar: At the bottom of the Notes Manager window, you can see that there is a status bar. This status bar will always provide quick information regarding the clicked item at the Notes Tree. For example, if you click a Desktop, it will show you the total number of notes inside this Desktop, if you click a note, it will show you information like note title, creation date, and approximate size in Bytes, if you click on the Search Results, it will show the total number of notes, and if you click over a note searched by text, it will show also the number of matching terms. If you click an item for the Synchronization File, it will also show specific information for the selected Database Image or Note inside the Sync File. |
Finally, you will find on the right side of the Notes Tree a vertical black bar, called "Vertical Split Bar". It allows you to easily change the size of the Notes Tree and Notes List on the Notes Manager. To use it, just click and grab it it with your mouse.
Copyright© 2013 Fabio Martin | Privacy Policy |
Contact Me

This work by 7 Sticky Notes is licensed under a Creative Commons Attribution-NonCommercial-NoDerivs 3.0 Unported License
Permissions beyond the scope of this license may be available at www.7stickynotes.com.
This work by 7 Sticky Notes is licensed under a Creative Commons Attribution-NonCommercial-NoDerivs 3.0 Unported License
Permissions beyond the scope of this license may be available at www.7stickynotes.com.